

Secure Boot is a BIOS setting that confirms the digital signature of the operating system and/or software that loads during the boot procedure. It is a specific type of security protocol that ensures your system only boots with trusted software.
So, if you enable Secure Boot on an ASRock motherboard, this helps to protect your computer from malicious software, including rootkits and bootkits. It’s supported on many Linux distributions, BSD variants, and modern Windows versions.
How To Enable A Secure Boot ASRock Motherboard?
For your information, if you want to enable Secure Boot on an ASRock motherboard, you must first access the BIOS (Basic Input/Output System) settings. The following steps are included in the process.
Step 1: Restart your computer (or turn it off and then back on).
Step 2: Once the ASRock logo appears on the screen, press the BIOS key during POST to get to the UEFI setup; it is usually the F2 or Delete key for the ASRock systems.
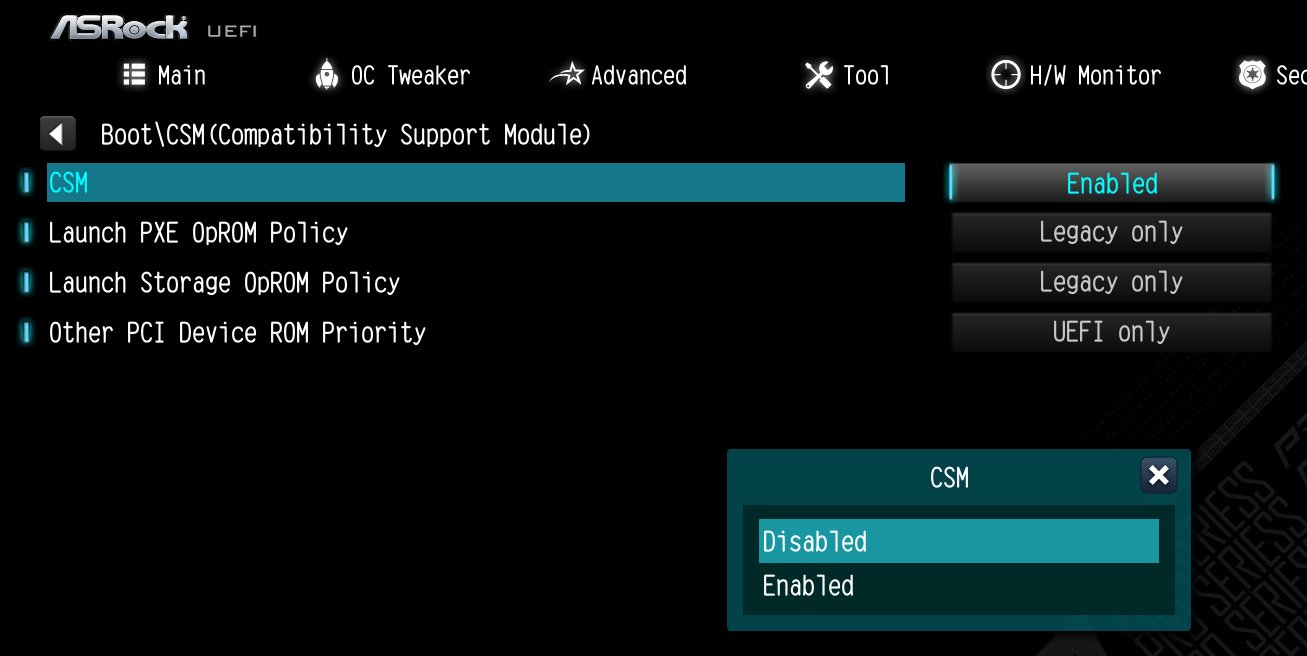
Step 3: Go to Boot > CSM (Compatibility Support Module). Set the “CSM” to Disabled. Save the configuration alterations by pressing the “F10” key.
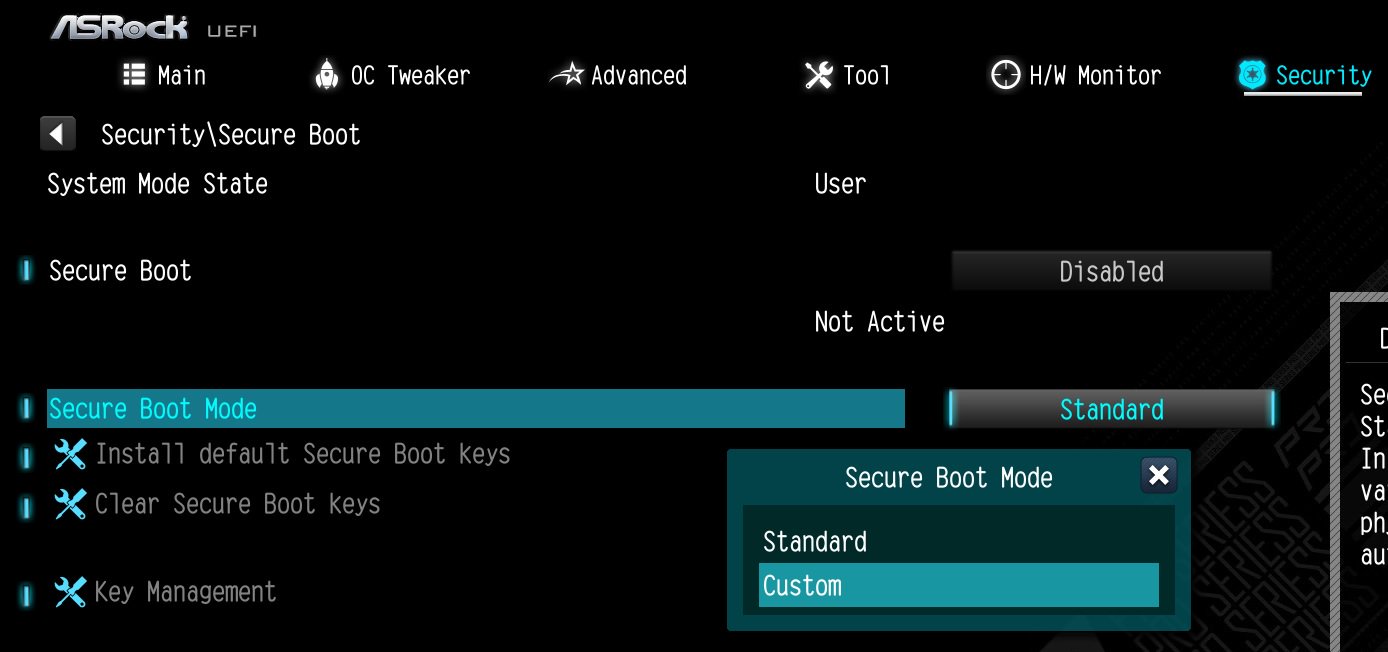
Step 4: Go to Security > Secure Boot. Keep the “Secure Boot Mode” to “Custom”.
Step 5: Once “Secure Boot Mode” is set to “Custom”, press “Install default Secure Boot keys”. Select “Yes” from the popup window to start the installation process.
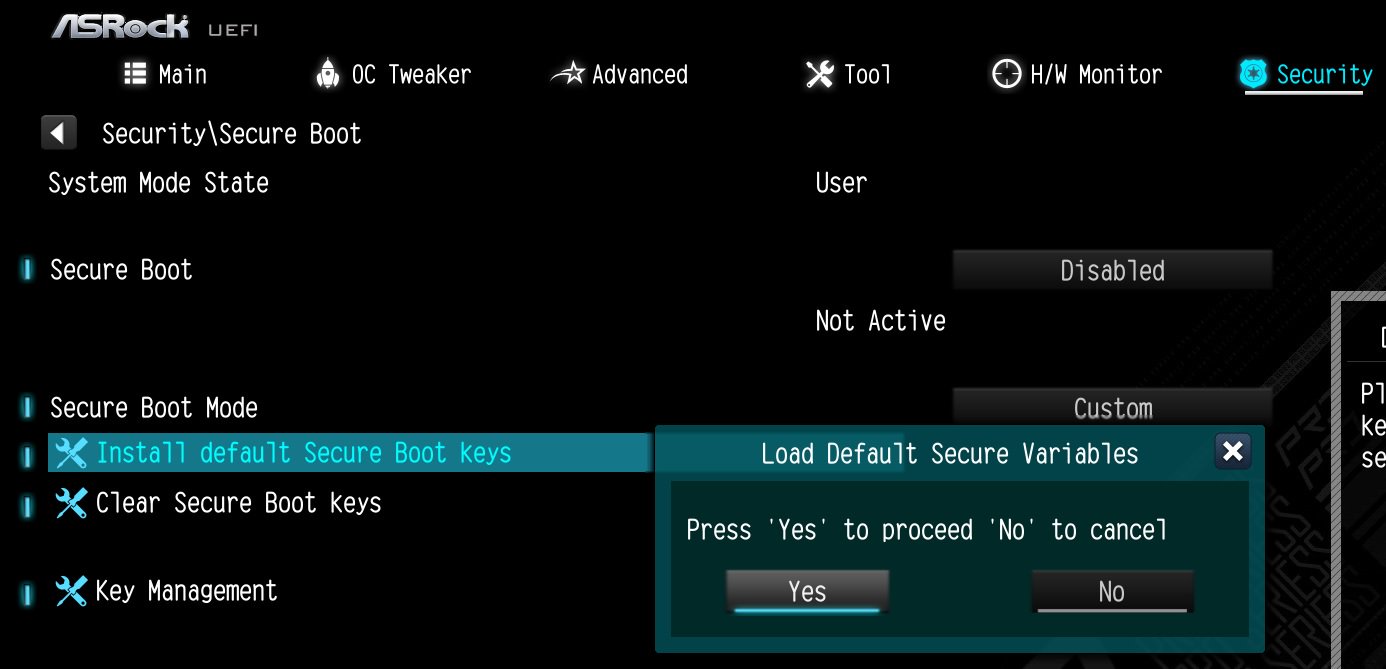
NOTE: For AM5 platforms, if you see “Discard Changes and Exit” on the screen after clicking “Install default Secure Boot keys”, select “No”. Continue to the next step, Step 6.

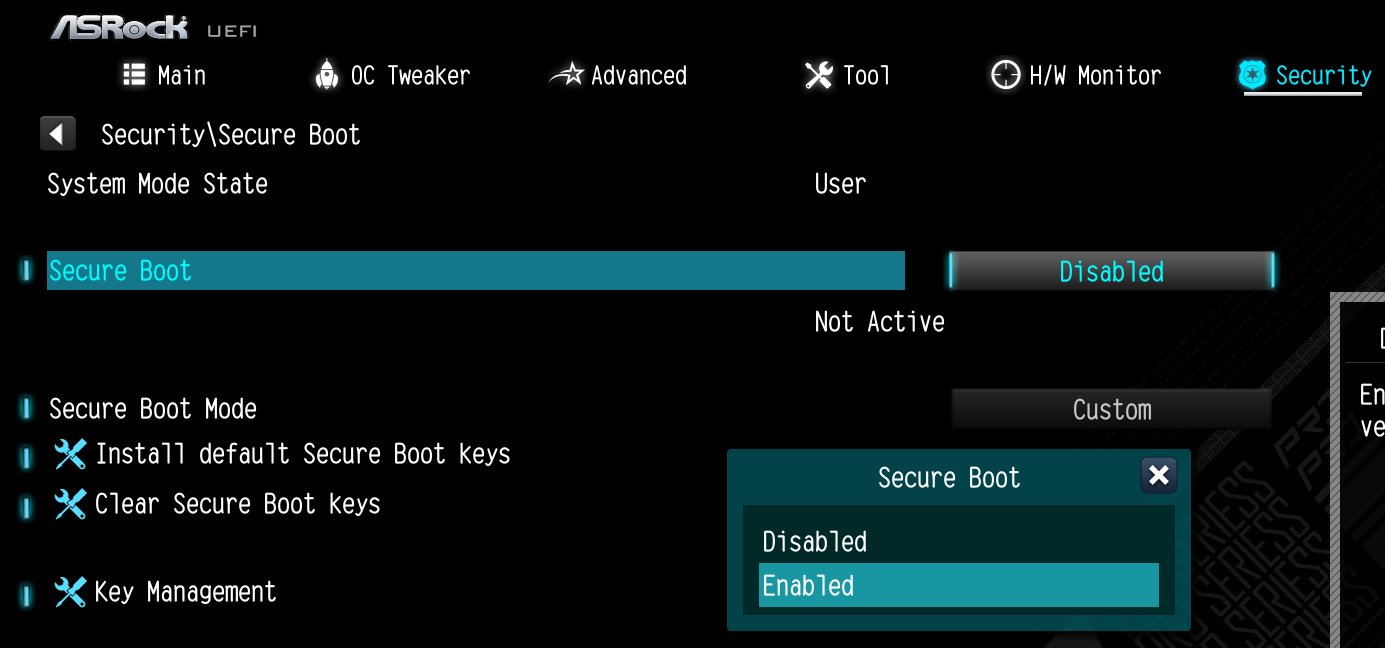
Step 6: Now, set the “Secure Boot” to “Enabled”. As we did earlier, press the “F10” key to save the newly-adjusted settings.
NOTE: The above-mentioned steps to activate Secure Boot Mode can vary based on your BIOS version and ASRock motherboard model. If you find any of these steps a bit different from what we have told you, consult your motherboard’s manual.
How Do I Know If Secure Boot Is Enabled Or Disabled On ASRock Motherboard?
To confirm whether the Secure Boot is enabled or disabled on your ASRock motherboard, enter into the BIOS mode first.
- Restart your computer (or turn it on). Press the BIOS key (F2/Delete) to access the ASRock’s BIOS/UEFI menu.
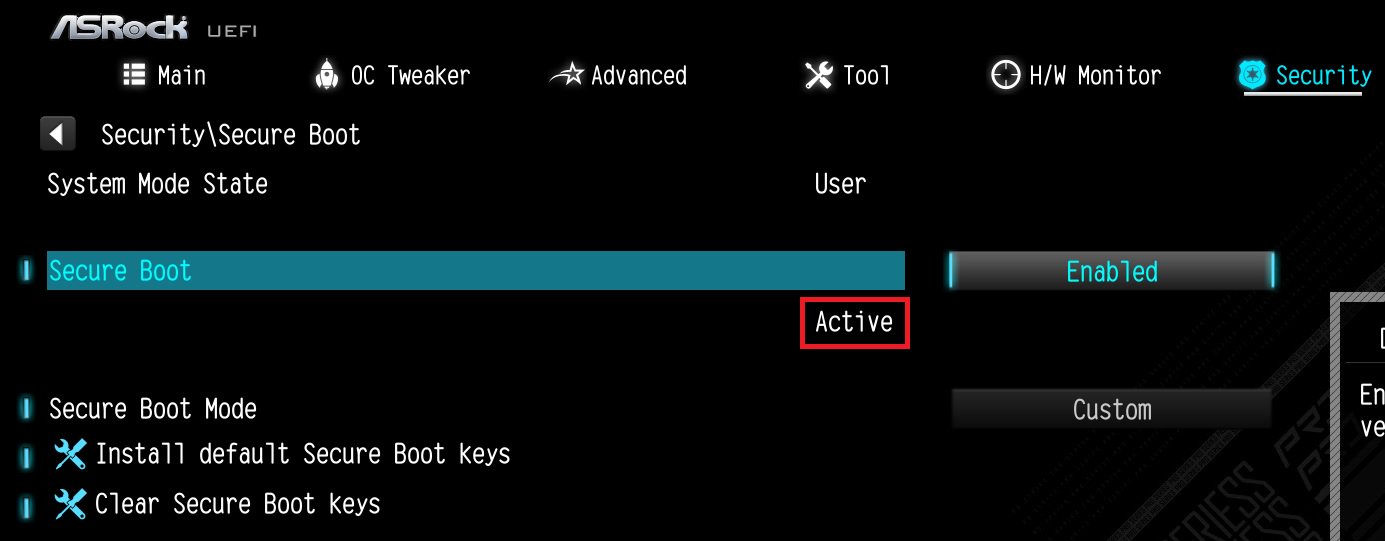
- Go to Security > Secure Boot.
- Look for the “Active” tab; the Secure Booth must be both “Enabled” and “Active” in order to get this feature working properly.
Should I Enable Secure Boot On ASRock Motherboards?
No doubt, enabling Secure Boot on ASRock motherboards prevents unauthorized software from booting on your computer, making it harder for malware to infiltrate your system. It also prevents software conflicts that can cause system crashes or instability.
However, whether to enable or disable Secure Boot on your ASRock motherboard depends on your specific needs and use case.
For example, if you want to install Windows 11 on your PC, you’ll need to enable Secure Boot first; it is one of the requirements to install Windows 11. However, if you are using an older or custom operating system, you may disable Secure Boot mode.
Conclusion:
Secure Boot is made to prevent unauthorized software from booting on your system. Enabling it enhances system stability and is essential for Windows 11 installation. However, its necessity depends on specific needs and use cases.
To enable it, all you need to do is to access the BIOS settings by pressing F2/Delete key when your system is restarting. Next, disable the Compatibility Support Module (CSM), set Secure Boot Mode to Custom, and select “Install default Secure Boot keys”.
Frequently Asked Questions
What Is Secure Boot Mode In BIOS?
Secure Boot is a security feature designed to ensure that only authorized software with valid digital signatures can boot on your computer. It works by verifying the operating system’s and other software’s digital signature before allowing them to run.
Which Operating Systems Support Secure Boot Mode?
Secure Boot is supported on modern versions of Windows, Variants of BSD, and many distributions of Linux.
Does My PC Support Secure Boot?
Secure Boot is supported on the following operating systems:
Windows 8 and 8.1
Windows Server 2012 and 2012 R2
Windows 10
Windows Server 2016, 2019, and 2022
Windows 11
VMware vSphere 6.5
Many Linux distributions
NOTE: To confirm whether your system supports Secure Boot, open the Start menu and search for “System Information” here. Look for “Secure Boot”. If you see the option, your system supports this security feature.
Why Can’t I Enable Secure Boot In My BIOS?
There are a few reasons why you might not be able to enable Secure Boot in your BIOS:
BIOS doesn’t support it
Secure Boot is hidden or locked
BIOS is outdated
Administrator password isn’t set
Incorrect BIOS security settings
Legacy boot device installed
Third-party bootloader
Platform Mode is in Setup Mode
NOTE: To fix these issues, you try updating your BIOS, restoring BIOS settings to factory defaults, setting an administrator password in BIOS Security, and selecting the option to “Restore Factory Keys”.

![Should I Upgrade My Motherboard? — [See Final Answer]](https://i0.wp.com/www.firstattackpr.com/wp-content/uploads/2024/01/Should-I-Upgrade-My-Motherboard.jpg?fit=450%2C210&ssl=1)
![Does My Motherboard Support M.2? — [Easy Way To Find]](https://i0.wp.com/www.firstattackpr.com/wp-content/uploads/2024/01/Does-My-Motherboard-Support-M.2.jpg?fit=450%2C210&ssl=1)
![Do All CPU Coolers Fit All Motherboards? — [Final Answer]](https://i0.wp.com/www.firstattackpr.com/wp-content/uploads/2024/01/Do-All-CPU-Coolers-Fit-on-All-Motherboards.jpg?fit=450%2C210&ssl=1)
![How To Enter BIOS ASUS Motherboard? — [Two Easy Ways]](https://i0.wp.com/www.firstattackpr.com/wp-content/uploads/2024/01/How-To-Enter-BIOS-ASUS-Motherboard.jpg?fit=450%2C210&ssl=1)

![How Much Power Does A Motherboard Use? — [Calculated]](https://i0.wp.com/www.firstattackpr.com/wp-content/uploads/2024/01/How-Much-Power-Does-A-Motherboard-Use-—-Calculated.jpg?fit=450%2C210&ssl=1)
![How Many GPU Can A Motherboard Support? — [Explained]](https://i0.wp.com/www.firstattackpr.com/wp-content/uploads/2024/01/How-Many-GPU-Can-A-Motherboard-Support-—-Explained.jpg?fit=450%2C210&ssl=1)
![How To Identify BIOS Chip On Motherboard? — [4 Easy Ways]](https://i0.wp.com/www.firstattackpr.com/wp-content/uploads/2024/01/How-To-Identify-BIOS-Chip-On-Motherboard-—-4-Easy-Ways.jpg?fit=450%2C210&ssl=1)